Friday, July 31, 2015

Restaurant Review: Jackson & Rye, London

 With a name like Jackson & Rye I should have realised straight away this was an American-style restaurant. Rye is used in making whiskey and Jackson is the capital of the state of Mississippi. The restaurant, which has three branches in London, has a ‘rye list’ – like a wine list but different types of whiskey – and a ‘blue plate special’ section. This is a term I’ve come across in other American restaurants like the Diner in Spitalfields and am never quite sure what it means – I even asked an American colleague once and she was a bit unsure but said it was a mixture of a specials board and a special (low) price.


I was there for dinner with two friends and found it difficult to choose from everything on the menu – this is a restaurant for people who like their food, and plenty of it. From steak and eggs to fried buttermilk chicken and crab cakes – and of course hamburgers – the menu is American through and through. There are also salads and pasta dishes, and fish – including lobster – and side orders including creamed grits, baked mac and cheese and maple bacon.

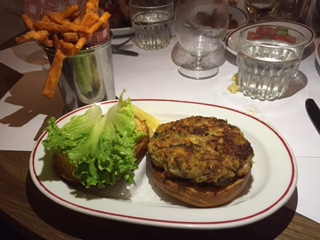
I chose the shrimp burger which came in  a brioche roll with fries; it had a chunkier texture than I was expecting (I’ve had fish burgers that are more like fishcakes) and was delicious. My friends ordered the lobster and one of the daily specials, a rack of lamb, and we decided to have the truffled mac and cheese starter to share. My friend then also ordered the truffle arancini, which was delicious, and a side of maple bacon, which I didn’t try – I found it quite strange as an idea. I can understand ordering extra bacon if you want to put it in a burger or mix it into your mac and cheese but as a side to eat with a rack of lamb? Each to their own I suppose!

Thursday, July 30, 2015

Chocolate Animal Biscuits


I don’t know what it is about Cadbury Animal biscuits that makes them so moreish.
 
It’s not just the Cadbury chocolate on one side, but the biscuit itself – which is actually made by Burton’s, who also make Wagon Wheels, Maryland cookies and Jammie Dodgers – which I love. They are so cute too – shaped like different animals and the chocolate side – if I remember correctly, as I haven’t bought them in a while – has a distinctive ridged pattern.
 
I was sent some products not long ago by Mein Cupcake which trades in the UK as Cake Mart and among the items I chose was this cute little cow cookie cutter. It’s a nice cutter – very robust so it won’t get squashed out of shape, and you get enough detail without it being too fiddly.
 
I decided to make animal biscuits and kept the recipe fairly simple; I used:
250g butter, softened
150g caster sugar
1 tsp vanilla flavouring
1 egg
250g plain flour
Pinch of nutmeg
100g milk chocolate
 

Mix all the ingredients together in a large bowl until you have a dough. Wrap in clingfilm and chill in the fridge for at least half an hour.
 
Preheat the oven to 180C, and roll out the dough on a lightly floured surface. If the dough is too sticky, add a little more flour and work it in.
 
Use your cookie cutters to cut out the shapes and place on a baking tray lined with greaseproof paper. Bake for 10-12 minutes until golden but still slightly soft.
 
Allow to cool.


Melt 100g milk chocolate in a bain marie or microwave and spread over the back of each biscuit. Use a fork to run through the chocolate before it has set to make the vertical marks. Refrigerate until the chocolate has set.


These were lovely – not quite the same as the Burton’s/Cadbury’s biscuits (I wish I knew their recipe!) but really good, and they would be fun for children to make too.


Tuesday, July 28, 2015

Restaurant Review: Belize

Mug Cakes: Sticky Toffee Pudding and Dr. Oetker Review


Last Christmas I received a book called 'Mug Cakes' full of recipes to make in the microwave in a mug. It's a brilliant concept- when you really fancy something cake-y for dessert but want it then, not in an hour's time! I have already made a few mug cakes (chocolate, and toffee and pear) and when the weather was bad a little while ago we really fancied cake, so I flipped through the book until I found something we would both like where I had all the ingredients. I decided upon a sticky toffee pudding.

To make one, you need:
The largest mug you can find
2 tbsp. butter, softened, plus extra for greasing the mug
4 tbsp. toffee sauce
1 egg
1 tsp vanilla extract
2 tbsp. dates, chopped
3 tbsp. brown sugar
4 tbsp. self-raising four

Grease the inside of the mug and spoon in 3 tbsp. of the toffee sauce.

 
 Place the butter, egg, 1 tbsp. toffee sauce, vanilla and dates into a small bowl (or another mug, but a bowl is easier) and beat together with a fork. Fold in the sugar and flour and mix in. Spoon into the mug that has the toffee sauce at the bottom.


Microwave for 2 and a half minutes on high if you have a 600 watt microwave or 2 minutes for a 1000 watt microwave. You can estimate somewhere in between eg 2 minutes 15 seconds for a 800 watt microwave.

Leave to cool enough that you can eat it; you can either turn the cake out into a bowl as the toffee sauce at the bottom should then run over the top, or eat it straight from the mug - to save on the washing up!


That's what we did and the cake was lovely and the toffee sauce at the bottom was an added bonus.

Not long after this I saw that Dr. Oetker had launched its own range of mug cake mixes which are even quicker - you just mix milk with the powder, microwave them for a minute and you're done! I thought this was a brilliant idea - mug cakes are pretty quick anyway but you still can't quite make them in a television advert break by the time you have found the ingredients in the cupboard and mixed them together! Whereas the Dr. Oetker mixes really are super fast.

I was sent three flavours for review: chocolate, chocolate chip and lemon. I have to admit I haven't tried the lemon yet (but will update this post when I do!) - the weather has gotten warmer again and I don't really fancy cake!


You literally just mix the powder with milk. This is the chocolate chip...


... and this is chocolate flavour.


Microwave and the cake is risen and ready.


I was sent a few other bits and pieces by Dr Oetker including this chocolate cupcake centre - it has a nozzle you insert into the cake, squeeze and it fills it with chocolate sauce.


I topped it off with a mini chocolate heart. These are so cute and brilliant for decorating cakes or desserts.


This is the finished chocolate cake - it hasn't risen anywhere near as much as my home-made mug cakes do.

Side-by-side an instant hot dessert. The cakes did definitely taste more artificial than my homemade version and I found them incredibly sweet. I'd prefer these with a little less sugar but for those times when you have immediate cake cravings - or like when I was a student, you don't have an oven - I think these are a great idea.


Thanks to Dr. Oetker for sending the cake mixes, chocolate filling and hearts for review. All opinions are my own.

Monday, July 27, 2015

Meal Planning Monday week 31

Monday
Lunch: chicken and cous cous salad
Dinner: chicken curry
Tuesday
Lunch: salad/sandwich from whatever is in fridge
Dinner: houmous-crusted chicken inspired by this recipe maybe with fried potatoes
Wednesday
Lunch: salad/sandwich from whatever is in fridge
Dinner: I'm out overnight in a hotel as I have to be in the office extremely early tomorrow morning.
Thursday
The company I work for reports H1 results today and as I work in communications I have to be in the office several hours before most other people:
Breakfast: probably sausage sandwich from the canteen after my early morning work is done
Lunch: will have to buy something as I won't have been home since Weds morning
Dinner: Enchiladas
Friday
Lunch: salad/sandwich from whatever is in fridge
Dinner: fish and vegetables for me, chicken kiev for him
Saturday
Lunch: Potato wedges nacho style from Slimming World magazine
Dinner: BBQ if the weather is nice
Sunday
Lunch: out. I need to practice driving longer distances so will pick a location and we can find somewhere for lunch
Dinner: Salmon en croute with veg for me, chicken pie for him

Sunday, July 26, 2015

Restaurant Reviews - Mexico Part 2

Saturday, July 25, 2015

Langos - Fried Bread with Cheese


When we were in Monument Valley in America we ate something called Navajo Fry Bread that was served either sweet or savoury and was kind of doughy on the inside and crispy on the outside. When we went to Vienna we wanted a snack while we were at the zoo and kept seeing snack stands advertising langos which were very similar but I think served with garlic butter. My boyfriend loved them and I kept intending to make them at home but never got round to it.

When I was looking for something to make for Formula 1 Foods to go with the Hungarian Grand Prix I came across langos - I think they are originally Hungarian even though there are popular in Austria. Result!

They are very easy to make; they take a little bit of time as you need to leave the dough to prove twice but only for half an hour each time, so I started making these at 11am and we had them for lunch. The recipe recommended serving them with sour cream and grated cheese which was delicious.

Mix the flour, yeast and water with salt dissolved in it so you have a dough.

Cover and leave to prove for half an hour and then roll out on a floured surface. I had to add a little more flour to my dough as I found it was too wet. Cut out circles with a large circular cutter - I got eight out of this. I would say this quantity serves 2-3 people as a lunch if you have them on their own but I think they would be great with some crispy bacon or you could have just one as part of a fry up.

After you have cut out the circles leave them to rise for another half an hour. Heat about an inch of oil in a frying pan and fry the dough on both sides for a couple of minutes until golden brown. Serve hot with a dollop of sour cream and some grated cheese.


I'm sending these to Formula 1 Foods, the blog challenge I created to tie in with each country hosting the Grand Prix. Please join in!

Friday, July 24, 2015

BBQ Pizza - Pizza cooked on the barbecue


Did you know that you can cook pizza on a barbecue? I've been trying out some different things this summer since we bought a Weber gas barbecue and came across this article on the Telegraph website from a couple of years back. As it points out, you need a barbecue with a lid you can close as this recreates the effect of a pizza oven. It also recommends using a pizza stone to avoid scorched patches of crust, which I did but I still had a few burnt bits!

The pizza dough is easy to make following the recipe given; you can top it with anything you like. I used passata, mozzarella, grated Cheddar and leftover sausage and bacon which was already cooked.

pizza dough

I used my giant pizza paddle from the Dot Com Gift Shop that was reduced from £16.95 to £5.95 in their sale. It was just the thing to lift the pizza and slide it onto the pizza stone.


As I had enough dough for two pizzas - and only one pizza stone to use on the barbecue - I cooked the other pizza in the oven. It was nice but the pizza cooked on the barbecue was actually much better! So give it a go if you have a gas barbecue this summer!


I'm sending this to Tea Time Treats, hosted by Karen at Lavender and Lovage and Jane at The Hedgecombers as their theme this month is barbecue.


 I'm also sending this to Bready Steady Go, hosted by Michelle at Utterly Scrummy and Jen's Food.

Thursday, July 23, 2015

Pina Colada Cupcakes


I've written before about Sugar and Crumbs, a company which makes flavoured icing sugars and cocoa powders from natural ingredients. I first came across them at a cake show and I think it's a brilliant idea, especially for those flavours which are hard to replicate. So I was excited when they sent me a packet of pina colada icing sugar to try. It costs £1.99 for 250g or £3.49 for 500g which is plenty for a dozen cupcakes. So not something I would buy every day (you have to pay postage as well) but it's a great idea for something a bit different.


I've made pina colada cupcakes once before but this time I used a different recipe from a fun book called Make Bake Cupcake. I didn't use the frosting recipe from the book though. This is what you need to make 12:

190g plain flour
1.5 tsp baking powder
pinch of salt
115g butter, softened
200g caster sugar
2 eggs
2 tbsp. rum
125ml milk
85g tinned pineapple, crushed
60g of dessicated coconut to decorate
500g Sugar and Crumbs pina colada flavour icing sugar
250g butter, softened
cocktail umbrellas to decorate

Preheat oven to 180C and line a muffin tin with paper cases - I used yellow ones.

Cream the butter with the sugar then beat in the eggs. Mix in the rum and milk and gradually add the flour along with the baking powder and salt. Finally stir in the pineapple.

Spoon the mixture into the paper cases and bake for 18-20 minutes until cooked. Allow to cool.


Mix the Sugar and Crumbs pina colada flavour with the softened butter for the buttercream. Using a piping bag and star nozzle pipe swirls on top of the cupcakes. Sprinkle over the dessicated coconut to decorate and top with a mini cocktail umbrella.


I'm sending these to Tea Time Treats, hosted by Jane at the Hedgecombers and Karen at Lavender and Lovage as their theme is barbecues.


And I'm sending these to Treat Petite, hosted by Stuart at Cakeyboi and Kat the Baking Explorer; the theme this month is summertime special.


Thanks to Sugar & Crumbs for sending me the icing sugar to review.

Wednesday, July 22, 2015

Spiralized Sweet Potato Waffles


I got a Spiralizer for my birthday and bought myself a recipe book called Inspiralized to go with it. A spiralizer lets you turn fruit and vegetables into spaghetti-like strands which can be used in a whole host of different ways. I liked the sound of this recipe for sweet potato waffles though I wasn't sure how well it would turn out, but I can say that the recipe was a success!

The recipe can be found online here at Food Republic; I changed it by serving the waffles with Greek yogurt, honey and fresh peaches rather than blueberries and maple syrup.

First peel and spiralize a sweet potato: this is enough for one waffle.


This is what the sweet potato ends up like:


Mix the sweet potato noodles with a teaspoon of cinnamon and heat some Fry Light (spray oil) in a frying pan. Add the noodles and put a lid on the pan; heat for five minutes until the noodles have softened.
  

Preheat a waffle maker. Mix the noodles with a beaten egg and a dash of vanilla and shape so it fits into the waffle maker. Close the lid and cook until it has cooked and is crispy on the outside.


This is the waffle once it is cooked


I ate mine with Greek yogurt, honey and peaches, which was delicious.


 I'm sending this to Simply Eggcellent hosted by Dom at Belleau Kitchen as the theme this month is breakfast dishes using eggs.


I'm also sending this to Extra Veg, hosted by Michelle at Utterly Scrummy and Helen at Fuss Free Flavours.